Saturday, August 31, 2013

Skillet Pie Apples


Our days of Summer vacation are winding down so I am trying to make the last days extra special. This past week we have made what we are calling Skillet Pie Apples. Just a nice, little sweet during the day to eat with vanilla yogurt or better yet, ice cream. Nattie loves them, especially because she has made it the last few times. Simple and quick to make especially with a toddler around and no oven required.


Skillet Pie Apples

2 large granny smith apples
2 tbsp. unsalted butter
1 tsp. ground cinnamon
1/4 tsp. ground ginger
3 tbsp. brown sugar
3 tbsp. all purpose flour

Finely chop the apples. In a cast iron skillet, over medium heat, melt the butter. Add the apples, give it a nice stir with a wooden spoon. Sprinkle cinnamon and ginger over apples, stir again until the apples look evenly coated. After a few minutes the aroma of apples will start to fill the kitchen. Inhale deeply, smile and add brown sugar to the apples, mixing with the spoon. Lower the heat just a bit and wait for the smell of apples and brown sugar to make you smile, again (a few minutes). Add the flour, stir into the apples, cooking the flour until you no longer see any white of the flour in the mixture. Now you are ready to put in a bowl with yogurt or ice cream!

Makes 2 nice sized servings or 3 moderate servings. I like to add about a half cup of chopped pecans to the mix but this is how my daughter likes it.

A little bit of Summer mixed with a little bit of Autumn. Kind of perfect for this Indian Summer weather we are having.

Andrea


Wednesday, August 28, 2013

Waters.


Water. Beautiful, calm, flowing, tranquil, cool, raging, deep, uncontrollable. You can float on the surface. You can drown in its depths. Water can be gentle and it can be tumultuous.

When you are a child, you need someone to hold you, to guide you in the water. It's a joy because it feels good to be in it, especially when cooling off from a hot day. You feel weightless, almost like flying in an alien world. You don't need to do much but enjoy it because someone is supporting you, keeping you afloat.

Floating can feel both carefree and aimless. Drowning, on the other hand, is terrifying. Sinking deeper, suffocating, with little to no hope. The past few days I've been floating. Wanting to keep myself above waters and not find myself spiraling down in a vortex of sadness. This is when survival kicks in. Though its good to battle and not allow things to sweep me away, it's better to remember who is holding me in the waters. Who's child I am.

...“Do not be afraid, for I have ransomed you. I have called you by name; you are mine. When you go through deep waters, I will be with you. When you go through rivers of difficulty, you will not drown...For I am the Lord, your God, the Holy One of Israel, your Savior...(Isaiah 43:1-3 NLT)


My son loves the water, as my daughter does. He has no fear of it because he is not aware of the dangers that lie within not knowing how to swim in it. He would walk straight in to it if you let him. A few days ago we were invited to a friend's house for swimming and BBQ. I took a few photos of my family enjoying the pool. I saw delight on the faces of my children, but especially thought about my toddler son. So helpless if it weren't for his father being in the water with him. 

And it hit me. In this small, earthly way, here was a picture of something I needed to hear. To be reminded of. I am that child, very much like my son. I am being guided through whatever body of water I am in. God the Father will not leave me to be lost at sea, or to drown. Whatever rivers of difficulty, He is my life support.

I can choose to enjoy the waters, regardless if they are raging or are serene. I can remember what His word tells me and allow that to color how I see things. In daily life difficulties especialIy, I pray that I do. 

Andrea

Wednesday, August 21, 2013

Camp Lupine


The night closes, with all my sweethearts laying in bed, deeply asleep. I just put my girl to bed not long ago, thankful for the chance to pray with her. Usually we all pray together but sometimes when I'm with the boy trying to get him to sleep, her daddy prays with her and puts her in bed. Since he has been working long hours, almost everyday, it was a nice change to tell him to go to bed while I took her to her room. 

As I began to pray, I started thanking God for allowing me to be home with my children, especially in the summer. It's not without certain sacrifices. We may not have all the things others have, or all the resources readily available but it has been a blessing. Making the most of what we have and learning to be thankful for it. 

I thanked Him for things like our backyard 'Camp Lupine'. On concrete ground beneath the bright California sun we have made a place for us to have fun as a family. A soda bottle becomes a sprinkler, sidewalk chalk draws a target on the brick wall to practice with a plastic slingshot and draws other things like hopscotch, buckets and pails hold water for toys to be dunked in or poured on. We've set up our teepee with sheets and blankets underneath and used our play pots and pans for 'cooking our foraged food'. We're even thinking of making a map of our camp within the concrete wilds and creating our own secret code with symbols.

I'm thankful for these things. It's not without its challenging moments, fits of frustration or displeasure. There's a nine year old, a one year old and a momma, it's bound to happen. Things get tough sometimes but it's life. Beautiful wonderful life and we are learning to live it. As a family, and each of us in our own walk. 

I'm thankful for Camp Lupine, what it's teaching us and how it's blessing us at the same time. I continued to pray with her, thanking Him for revealing things to me that I need to work on. Asking for grace for me to handle things better. To help me show my kids how to love more, have joy more, serve more. Thanking Him mostly for the life He has given me to do all these things.

Andrea

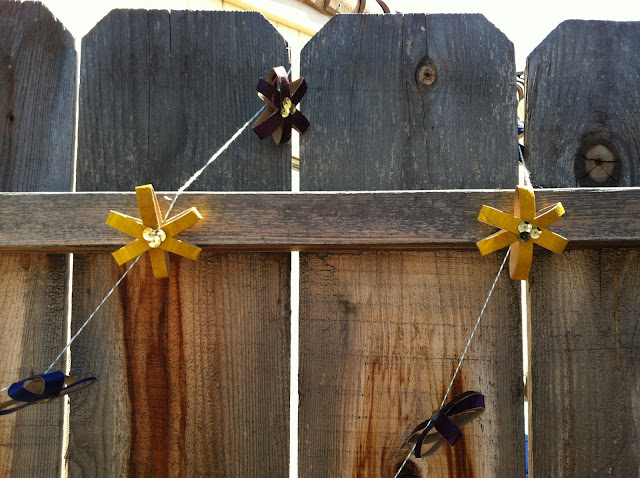
Flower garland, DIY recycled craft!

I enjoy crafting, especially when you create something out of found objects and/or items that will end up in the trash or recycle bin. The other day I created a garland for my daughter; flowers out of cardboard tubes (the nice way of saying toilet paper rolls).  I had been collecting the rolls for a bit and really wanted to try to make something different and practical. In the past we have made totem poles, owls, a yeti family and Halloween monsters but in effort to not just have another craft item around that we will have to put away, I came up with the garland idea. 

Cardboard roll flower garland

Items used:
toilet paper rolls
glue and glue gun
acrylic paint, assorted colors
big paintbrush
aluminum foil as a palette
baker's twine
sequins (I'm sure you can also use precut circle felts, pretty fabric or poms poms. Something lightweight so it doesn't drag it)

I had my daughter paint the rolls in four different colors. After the rolls were dried, I flattened the rolls a bit to make it easier to cut them into circular strips, about 1/4 inch each (more or less). Each flower is three strips put together, held by glue. I grabbed the first strip, dabbed glue in the middle of the top part (not inside the strip) to add the second strip on top in a 'x' shape. I pinched them together, add another dab of glue on top of the cross and put the third ring diagonally (think of putting it inside the 'x' shape). Since we had sequins and my girl does like a bit of bling, we glued three of them in the center to complete the flower. If you decide to use fabric, poms poms or something similar, I am sure hot gluing would be better (and faster). Since I used regular glue, I allowed them to dry overnight.

The next day was hot glue day! I have a love and hate relationship with the glue gun because frankly, I am not that good using it. It does get the job done, even if the globs of glue are super noticeable and unsightly and I have burned myself several times.  I grabbed my baker's twine (not cutting it's length yet, pulled it out about a foot before I started to glue the backs of the flowers to place the twine in. I did add one sequin on top (using tweezers to avoid burning myself) and eyeballed the distance between each flower. I set it up so that I had three flowers laid out at a time (how I wanted them on the twine) and glued them, place the string over and added the sequins. After it was done, I added another foot or so of twine and cut it.

So there you have it in a nutshell. I will try to get better at making tutorials! In addition, I have to share that once you have made them, be careful because it tangles up worse then Christmas lights. After I glued the three flowers, letting them dry in between, I just gently pushed them over to work the next three. They didn't tangle during the making but carrying them around was tricky. Also, they do seem to droop a bit downwards once hung up so maybe not gluing them in the middle but on top will help them stay straight.


This is a pretty versatile craft. I was thinking of more color combinations to try, so here goes:
  • yellow flowers with black centers for Black Eyed Susans
  • white flowers with yellow centers for Daisies
  • red flowers with yellow centers for Poinsiettas
  • all black flowers for Halloween decor (or orange, yellow and white)
  • red and turquoise flowers for a retro Christmas (or traditional holiday colors)
  • red, pink and white for Valentine's Day
  • harvest colors for Fall
  • all white for Winter
  • used with regular twine for a more rustic look
That's all I have for now. Oh, and how awesome of my loving friend in Louisville to send me a jar of her homemade jalapeno jelly (first photo). So grateful for good crafting and even better friends!

Andrea


Friday, August 16, 2013

Coffee and webs


As my morning coffee was perculating, I noticed something that did not belong. The drips of hot, fresh brew plopped into the base of the Chemex and there it was, a spiral of spiderweb inside. Poor spider built a home somewhere it was definitely not suppose to be. 

Sometimes I feel like I am not suppose to be where I am at. In my life, family, location, finances, happiness. That I'm left out on all sorts of wonderfulness that everyone else seems to be enjoying. In a permanent state of camping, a vagabond of a different sort. Not being able to do the things I feel my heart desires because of varying circumstances. To be honest, I couldn't tell you where I think we are meant to be not only for survival but for living. It can be disheartening when I focus on these things, allowing all joy and grace to be overwhelmed. Then I do remember His grace and His intentions. It doesn't answer the questions I so deeply want answers to but it does bring a peace. A peace knowing that wherever we are meant to be, we are not there yet because we are meant to be right here, right now, at this moment. Lessons are being learned, grace is being taught and resolve comes from this learning and experience. We are being encouraged to grow in ways that we never could otherwise. I have to take comfort in that truth. And to see the blessings that we do have. There are always blessings! He shows me I may not be getting what I want but He is giving me what I need. Love. His love abounds! While I walk in this valley, my eyes only want to see the mountains. I forget to see the beauty in the valley. The learning, and yearning for His desire and will to become my own. Yes, there is beautiful purpose in the valley. 

This morning, I had to dump out my coffee, give my Chemex a good wash, heat more water and wait longer for a new batch of coffee. I thought about how it was an inconvenience and my disdain for the spider who built its web there. Patience and tolerance over little things are good lessons to learn too.

Andrea

Thursday, August 15, 2013

Summer lessons


Summer has been unusual here. It's the middle of August and its 85 degrees. I'm thankful for this grace though I know it means, most likely that we are in for a hot Autumn. I won't worry about that now, today is sufficient for its own worries. I'm thankful for this time of learning how to be resourceful, that frugality can lead to much fun and creativity and that simple doesn't necessarily mean easy. The right work can be such a blessing and I want to work hard to have a joy filled, loving family. 

Without oxen a stable stays clean, but you need a strong ox for a large harvest. 
(Proverbs 14:4 NLT)

I'm learning what it means to step out of fear and comfort so that we can obtain the better things that are worth the work. It's a good lesson, probably one I will be forever learning. When the heat finally comes on full force, I'll be tested. My resolve, my joy, my work. By His grace, I will get through it, we will get through it. So for now, it's big messes of toys, water  hoses, buckets of water, sidewalk chalk  and the dream of getting a trampoline!

Andrea


Tuesday, August 13, 2013

Salted Fudgesicle Ghoul Bites


 Necessity is the mother of invention. Some might say that a sweet treat is not a necessity, but some (like my daughter) would beg to differ. On the heels of making a salted chocolate sauce for the ice cream sandwiches we made last week, I passed a molded tray in the kitchen and had an idea. Maybe if I made a chocolate sauce, we could pour it into the molds and make a little something nice. It doesn't matter that the tray is Halloween themed with witches and pumpkins and we are in the middle of August, right? Right!

While the kiddoes played Just Dance, I made a salted chocolate sauce much like the one from last week, without the chocolate chips. When the sauce was done, I poured it into the molds and while it cooled, I dropped in for a little dance with the kids myself. I also used the leftover sauce for an ice cold chocolate drink (add more almond milk, some sugar and ice into a blender and there you have it)! Afterwards, I placed it in the freezer and a few hours later, we had little fudgesicle bites! We popped the cold little witches into our mouths where they melted with a little salty and a little sweet goodness! The invention was approved and I'll most likely triple the recipe when we get a few popsicle molds soon.


Salted Chocolate Sauce

3/4 c. unsweetened almond milk
3 tbsp. unsweetened cocoa
1/4 tsp. sea salt (I used applewood smoked sea salt)
2 tbsp. white sugar

Add all ingredients in a small sauce pot over medium/low heat. Mix until sauce is smooth (feel free to sample. You may like the sauce sweeter or saltier. Pour into molds and let cool for about 15-20 minutes. Place tray into freezer (I put mine in a Ziploc first) and wait for at least 3 hours.  Pop them out of tray and enjoy immediately :)


Pretend you don't see that big blob of sauce on the left hand side. That never happened, ahem...


It's always nice when I take a leap and tell myself let's try something new. I can see the joy it brings my daughter and she doesn't mind having to help watch with her brother as much. It's an opportunity for us to learn how to manage even the small things as a family. It teaches me to allow the kids to have time with each other and attempt something. It teaches them how to interact with one another, no matter the age difference. It's not always perfect and sometimes I do get frustrated but it's all learning and in that, there's the beauty. I am thankful for these small moments, of family, grace and chocolate.

Andrea

Wednesday, August 7, 2013

Ice Cream Sandwiches


Summer is a wonderful time for so many obvious reasons. For the past couple of years, it's also proven to be a trying time for us financially since my husband's employer decided to make him a ten month employee. We've had to learn to be more frugal, more intentional and more creative which really, isn't too bad of thing. One of these way we lived out these qualities was by making something homemade to celebrate my mom's birthday yesterday. We didn't have much but we did have what we needed to make a delicious treat!

We decided on making ice cream sandwiches, with my daughter baking (by herself!) the cookies. I made a salted dark chocolate sauce and together with vanilla bean ice cream, it made the perfect summer birthday treat. It was also a test for me as well, managing overseeing my nine year old in the mixing and baking process, while keeping a good eye on my toddler. At one point, I just let him have a go at the Tupperware cabinet while my daughter was assembling a few of the sandwiches together.  All in all it was a success. We were give my mom a special homemade treat and naturally, my daughter loved that everyone enjoyed her cookies very much!


Chocolate and Pecan cookies
(recipe from Ghirardelli)
11 1/2 ounces Semi-Sweet Chocolate Baking Chips
1 cup butter or margarine, softened
3/4 cup sugar
3/4 cup brown sugar, packed
2 large eggs
2 teaspoons vanilla
2 1/4 cups unsifted flour
1 teaspoon baking soda
1/2 teaspoon salt
1 cup walnuts or pecans, chopped (optional) - See more at: http://www.ghirardelli.com/recipes-tips/recipes/chocolate-chip-cookies#sthash.U96Cr85a.dpuf

2 1/4 cups unsifted flour
1 tsp baking soda
1/2 tsp salt (we used applewood smoked salt)
1 cup (2 sticks) butter, softened
3/4 cup sugar
3/4 cup brown sugar, packed
2 tsp vanilla extract
2 eggs
10 oz chocolate chips (I tend to use dark chocolate chips but this time we used semi sweet)
1 cup (plus a tiny bit more!) chopped pecans

Preheat oven to 375 degrees F. Stir flour with baking soda and salt; set aside. Beat butter with sugar and brown sugar until creamy. Add vanilla and eggs, mixing until incorporated. Gradually blend flour mixture into creamed mixture. Stir in chocolate chips and pecans. Drop by tablespoon onto ungreased cookie sheets. Bake for 9-11 minutes or until golden brown.


For the Dark Chocolate Sauce, I really didn't use measuring cups or spoons. I had a few dark chocolate chips that I put in a small sauce pot over low/medium heat. I added almond milk to make it creamy but since I didn't have quite as many chocolate chips, I also added a little cocoa powder. I continued to stir it over the heat until most of the lumps were gone. Afterwards I added Applewood Smoked Salt little by little until it had the saltiness I was looking for.

Once the cookies and sauce were cooled, we laid a station out. A little sauce on one cookie, ice cream and the second cookie pressed on top. Ta-da!

Of course we had to try a few cookie before, you know, to test them out...


 Thankful to have all the ingredients we needed, for a daughter who was eager to learn (and now has called her company 'Big Bow Bake Shoppe'), for a son who creates little challenges to make us stronger and more resourceful, and for grace upon grace in even the small things. Above all these things, thankful for my mom, her relationship with her grandchildren and for God blessing all her years here on earth.

Andrea
Monday, August 5, 2013

National Gutierrez Strawberry Dipping Day.


This morning my daughter declared today National Gutierrez Strawberry Dipping Day. In the past, I've told her to hold off on her creative ideas often because I felt we couldn't do it for one reason or other. Now, I'm challenging myself to have fun with my children and to try to make things possible. I told her it was great idea and since we have strawberries, why not!

Being an impromptu family fun holiday, I tried to do my best with what we had. While she helped watch her clingy and tired brother, I put three dipping options out. So, for our first family fun holiday (which she would like to do twice a year) we had warm dark chocolate sauce (dark chocolate chips and almond milk), very raw organic honey and applewood smoked sea salt. Overall we were pleased with the results. Her favorite was using all three ingredients on the strawberry. We left a tasty, gloppy mess of a strawberry for daddy. Happy Monday!

Andrea


Thursday, August 1, 2013

An introductory, of sorts.


I can't think of a better time and place to write my first post. It's 3:31pm, on a breezy summer afternoon. My nine year old daughter and I are sitting on a blanket  beneath a tree in front of her school. My 17 month old son is napping in his stroller beside us. Seems nice until you realize it's because he is weaning, doesn't know how to nap on his own, and we are doing whatever we can to get him to sleep. 

A few minutes earlier, our friends and neighbors from the other side of the school drove up to us to see what was going on. Being resourceful. Trying to figure out solutions. This is the first time that I have ever been so called and aware to learning how to figure out solutions to everyday life. It has always been a concept but not fully realized until our second child was here and by God's grace, our eyes fully opened. Now, we are purposing to live life intentionally, wonderfully and fully in His grace. Even when it's hard, frustrating or slow going. Like today, with my son waking up only after thirty minutes. It may be a long evening but its never without grace. And it's life, beautiful life!

Welcome to Resolve House. 

Andrea